
Powershell Event Handlers in XM Cloud
Overcoming XM Cloud Limits with SPE

Intro
Migrating to XM Cloud has been a learning curve to say the least. Coming from a client that is highly dependent on backend customization, I’ve often found myself stuck trying to work around the limitations of a platform that restricts direct access to the backend.
Without the ability to drop in pipeline processors or deploy custom .dll files on a whim, traditional Sitecore tricks go out the window. But that doesn’t mean we're powerless.
That's where Sitecore PowerShell Extensions (SPE) comes in. With the right setup, you can hook into Sitecore item events—like item:added—and trigger automation scripts without ever deploying backend code.
Goal: Run a Script When an Item is Added
Let’s say you want to automatically modify an item or set default field values every time a content author creates an item. Traditionally, this would be a job for a custom event handler in C#.
With SPE, you can do this without code deployments, even in XM Cloud.
Step 1: Patch in the SPE Event Handler
In your Sitecore configuration (in this case, done via XM Cloud configuration layer), patch in the event handler provided by SPE.
This handler will listen to item:added events and pass the event along to any associated PowerShell scripts.
Step 2: Understand How the SPE Handler Works
Here’s what’s happening behind the scenes:
The SPE handler uses ScriptSession.SetVariable("eventArgs", (object) args); to pass the original SitecoreEventArgs object to your PowerShell script. That means in your script, you can extract the item from that variable and act on it.
Here’s the relevant section in C#:
Step 3: Create a PowerShell Module for Event Handlers
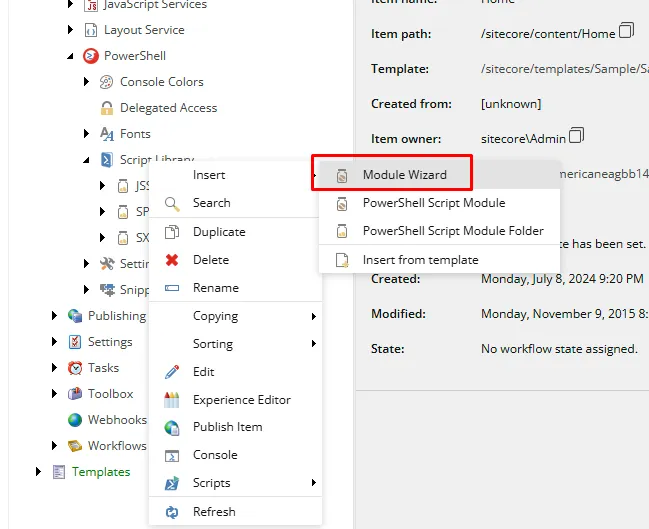
SPE organizes scripts into "modules" inside the /sitecore/system/Modules/PowerShell/Script Library/ path. To keep your scripts clean and discoverable:
- Right-click
Script Library→ Insert → Module Wizard - Give your module a name like My Custom Modules
- Enable Event Handlers as the integration point
- Click Proceed
Refer to the image below for visual guidance:
Step 4: Insert Your Script in the Right Location
Navigate to:
- Right-click
Added→ Insert → PowerShell Script - Name your script (e.g.,
Handle Item Added) - Click Okay
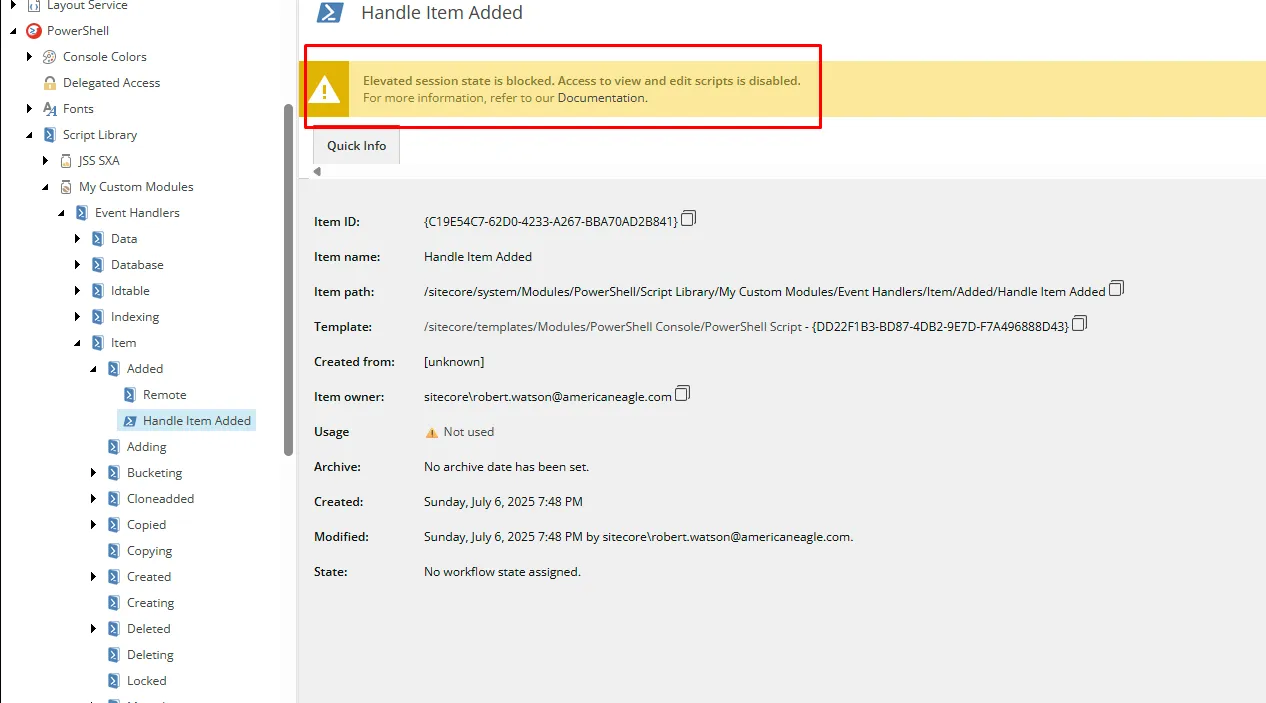
Step 5: Grant Script Execution Permission in XM Cloud
By default, XM Cloud blocks elevated SPE sessions, which disables editing or executing scripts with system-level access.
To allow SPE scripts to run on events:
- Go to your XM Cloud Deploy App in the Sitecore Cloud Portal
- Navigate to the Variables tab for the desired environment
- Add or edit the variable below
- Click Save, then Build and Deploy the app again
Step 6: Write the PowerShell Script
Here’s the sample script that gets triggered on item creation:
Troubleshooting
If you see this message in the script editor:
"Elevated session state is blocked. Access to view and edit scripts is disabled."
That means SITECORE_SPE_ELEVATION is still blocked. Double-check your environment variable and redeploy.
Final Thoughts
Using SPE to hook into Sitecore events lets you restore powerful automation in XM Cloud—even without backend deployments. It’s an elegant workaround for many common scenarios where pipelines or event handlers would have previously been used.
This approach is ideal for:
- Auto-tagging or labeling content
- Setting field defaults based on rules
- Triggering external integrations or logging